
Top Safety Concerns for Home Wheelchair Ramps: What You Need to Know
October 15, 2025
Choosing the Right Wheelchair Ramp: Essential Factors for Safety and Accessibility Explained
October 29, 2025
Many people ask, “How do I know if a Wheelchair Ramp Is the Right Size for My Needs?” You should measure the total rise and apply a recommended 1:12 slope ratio. Allow adequate landing space and handrails, and match the ramp length to your mobility and wheelchair type. Be aware that steep slopes increase the risk of falls, while a correctly sized ramp provides improved safety and independence for daily use.
Key Takeaways:
- How Do I Know if a Wheelchair Ramp Is the Right Size for My Needs? Measure the total vertical rise and use a 1:12 slope (1 inch rise per 12 inches run) as a general guideline to calculate the minimum ramp length.
- Provide adequate width and landings: aim for at least 36″ clear width and level landings at the top and bottom, and after any run that rises more than 30″.
- Match the ramp design to the user and site: manual users require gentler slopes and more frequent landings, while powered chairs can handle steeper grades. Verify local codes and ADA guidelines for compliance.
Understanding Wheelchair Ramps
Importance of Wheelchair Ramps
You rely on ramps to provide safe, independent access; a properly sized ramp reduces the risk of falls and avoids excessive exertion. Use a 1:12 slope as a baseline: for every 1 inch of rise, there needs to be 12 inches of run. Consider weight capacity, landing space, and handrails — these factors directly affect safety and usability. Ask yourself, “How Do I Know if a Wheelchair Ramp Is the Right Size for My Needs?” to guide measurements and design decisions.
- Accessibility for daily entry and exit
- Safety via non-slip surfaces and handrails
- Compliance with local codes and ADA guidelines
- The 1:12 slope rule balances safety and practicality
| Factor | What to check |
| Vertical rise | Measure the total inches from the ground to the threshold |
| Slope | Apply a 1:12 ratio for ramp length |
| Weight rating | Match the ramp to the user’s chair + occupant weight |
| Landing size | Allow a minimum of 60″ x 60″ for turning where needed |
| Surface/edges | Non-slip, edge protection, and handrails |
Types of Wheelchair Ramps
Portable, threshold, modular, folding, and permanent ramps each suit different needs: portable ramps for travel, threshold ramps for small rises, modular systems for customizable installations, and permanent ramps for long-term access. You should match type to rise, frequency of use, and space constraints to maximize safety and durability.
- Portable — lightweight, short-term use
- Threshold — low-profile, 1–3 inch rises
- Modular — customizable lengths and platforms
- The permanent option provides long-term stability and a custom grade
| Type | Best for |
| Portable | Travel, vehicle entry, short rises |
| Threshold | Door sills and small steps (1–3″) |
| Folding | Storage efficiency and occasional use |
| Modular | Residential entrances needing platforms/landings |
| Permanent | Homes and public buildings with heavy traffic |
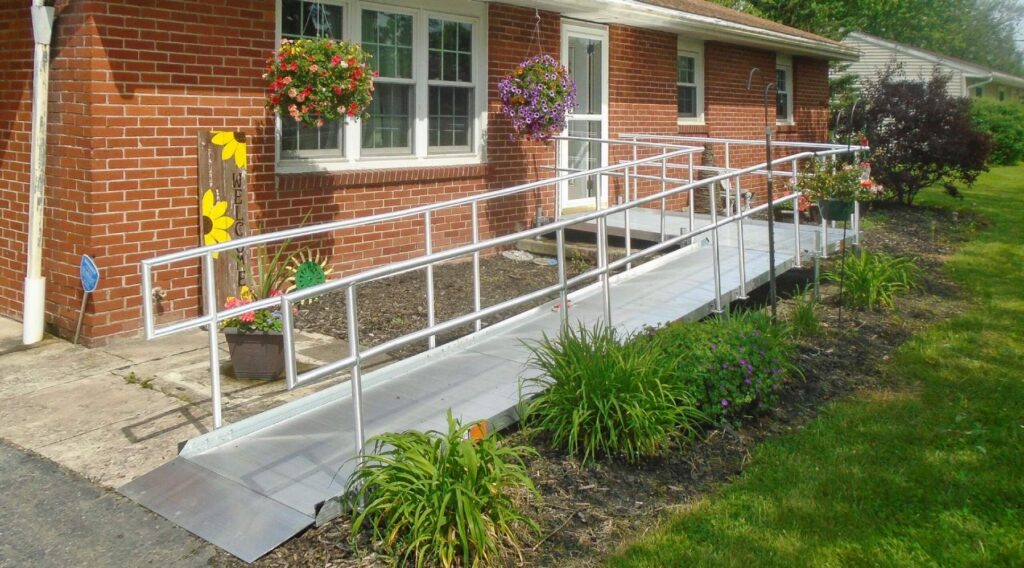
Materials, assembly, and required clearances vary. Aluminum ramps resist corrosion and are lighter, while steel ramps offer higher load capacity; composite surfaces, on the other hand, improve traction. For a 24″ rise, a modular or permanent ramp at 24 feet provides the recommended 1:12 run; portable ramps for vehicles typically range from 3 to 8 feet. You should also plan landings every 30 feet of run and include handrails for rises over 6 inches to reduce tipping hazards.
Common Uses and Applications
Homes, schools, businesses, vehicles, and temporary events utilize ramps for access. Residential entrances often require custom runs for porches, schools install modular systems for multiple thresholds, and emergency services favor portable ramps for rapid deployment. Assess the frequency and environment to determine whether to choose a temporary or permanent solution.
Examples: a single-family home with a 36″ front porch rise requires a 36-foot ramp at 1:12 or a switchback modular design to fit limited space; SUV access commonly uses a 4–6 ft portable ramp rated for 500–1000 lbs. You should evaluate weather exposure, maintenance, and local code requirements—public buildings generally follow ADA clearances, while private residences may allow more flexibility. The
Factors Influencing Ramp Size
- Wheelchair specifications (width, turning radius, powered vs manual)
- Weight capacity (user + chair + accessories)
- Rise and run measurements (vertical height and required horizontal length)
- Slope ratio (ADA 1:12 standard and alternatives)
- Landing, clearance, and local codes (turning space and handrail needs)
Wheelchair Specifications
You must account for seat width, overall width, front caster position, and turning radius. Typical manual chairs are 24–27 inches wide, while power chairs often exceed 30 inches and require a wider clear path. Aim for a minimum clear ramp width of 36 inches between rails to accommodate most models and allow for safe maneuvering. Verify your chair’s wheelbase so that ramps and landings provide adequate turning space.
Weight Capacity Requirements
Combine your body weight, the wheelchair’s weight, and any accessories to determine the total load. Manual chairs often weigh 35–60 lbs, while power chairs can weigh 150–400+ lbs. Choose a ramp rated above your total load—ideally with a safety margin—and avoid exceeding load limits, as exceeding capacity can cause structural failure.
Calculate using an example: if you weigh 200 lbs and your power chair is 250 lbs, select a ramp rated for at least 600–750 lbs to include dynamic forces and a safety buffer; aluminum modular ramps commonly list capacities from 600 to 1,500 lbs, while fixed concrete ramps are designed per structural code—consult manufacturer specs and local building requirements before finalizing.
Measuring the Rise and Run
Measure the vertical rise from ground to the top landing to the nearest 1/4 inch; divide that rise by the chosen slope ratio to get run (for 1:12, multiply inches of rise by 12 to get inches of run). Example: a 24-inch rise requires a 24-foot run at 1:12, so check available horizontal space before selecting a ramp type.
When space is limited, consider switchback or modular sections. Note that landings are required at the top and bottom, as well as after every 30 feet of ramp run, per ADA guidance. Include the landing length in your total horizontal footprint and confirm handrail clearance and surface transitions when planning.
Slope Ratio Guidelines
Follow the ADA 1:12 maximum slope for new construction (8.33%): one inch of rise per 12 inches of run. For independent users and powered chairs, you may prefer flatter slopes (1:16 or 1:20) to reduce effort and increase safety; steeper than 1:12 can require attendant assistance or specialized equipment.
Steeper slopes increase required pushing force and can strain motors or brakes; where 1:12 isn’t feasible due to space, evaluate alternatives like lifts or regrading, and confirm local code allowances—commercial projects often mandate specific slope, landing, and handrail standards that you must meet.
Recognizing How Do I Know if a Wheelchair Ramp Is the Right Size for My Needs?
Determining Ramp Length
Calculating Ramp Length Based on Rise
Measure the vertical rise from ground to entry, then apply your chosen slope ratio: at 1:12, multiply inches of rise by 1 foot, so a 24-inch rise needs 24 feet of ramp; at 1:16, multiply rise by 1.33, so that same 24-inch rise needs ~32 feet. To answer “How Do I Know if a Wheelchair Ramp Is the Right Size for My Needs?“, calculate the rise first and compare the resulting run to available space and user strength.
Recommended Slope Ratios
Public access typically follows the 1:12 maximum slope (1 inch rise per 12 inches of run); residential designers often recommend slopes of 1:16 or 1:20 for easier manual propulsion. Steeper slopes increase exertion and risk—power chairs may handle steeper grades, but user ability and safety should drive your choice.
Examples clarify trade-offs: a 30-inch rise needs 30 feet at 1:12, ~40 feet at 1:16, and 50 feet at 1:20. ADA requires landings at top and bottom and typically every 30 feet of ramp run; longer runs call for intermediate landings, handrails, and slip-resistant surfaces to meet safety standards.
Considerations for Space Constraints
If your site lacks straight-line space, consider switchback or L-shaped layouts, modular sections, or a vertical platform lift; each option trades off footprint, cost, and accessibility. Measure available length and width, then match that to your chosen slope to find feasible configurations.
Case example: A 36-inch porch rise requires 36 feet at 1:12. If you only have 12 feet of straight run, a two-run switchback with landings or a modular ramp system can be accommodated by folding the runs into the yard; a platform lift may be the only compact choice in very tight setups. Check local codes and permit requirements before finalizing your plans.
Ramp Width Requirements
Standard Wheelchair Widths
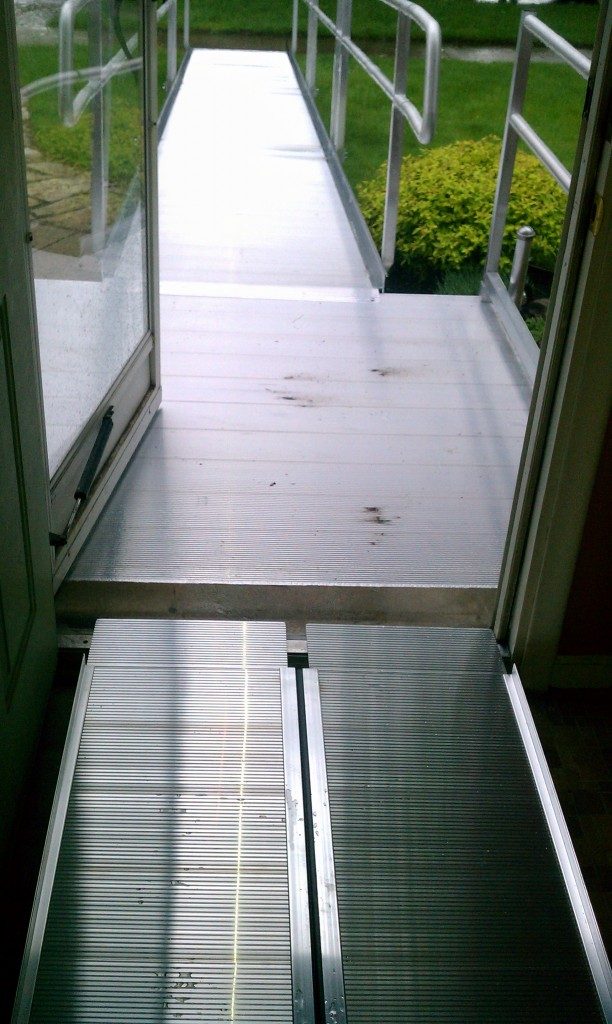
Typical manual wheelchair seat widths range from 16 to 20 inches, with overall chair widths usually 24 to 27 inches; many power chairs and transport chairs, however, reach widths of 30–36 inches. Building codes and the ADA require a minimum clear ramp width of 36 inches between handrails, but you may prefer wider ramps to accommodate armrests, cushions, or extra room for comfort and passing traffic.
Ensuring Stability and Usability
Match ramp width to user control: a 36-inch clear width meets code, but choosing a width of 42–48 inches improves maneuverability and reduces tip risk, especially on slopes. Ask yourself, “How Do I Know if a Wheelchair Ramp Is the Right Size for My Needs?” — check handrail placement, landing depth, and whether you can steer comfortably without scraping walls or tipping.
Handrails should be positioned between 34–38 inches above the ramp surface and be continuous. Provide edge protection, such as a minimum 2-inch curb on open sides, to prevent wheels from slipping off. Top and bottom landings require at least 60 inches of clear space for turns or transfers. Adding 3–6 inches of side clearance beyond the chair width reduces collisions with railings.
Accommodating Additional Mobility Devices
Scooters, powerchairs with wider bases, and companion-assisted chairs often exceed 36 inches; many require a clear ramp width of 42–48 inches. Plan for the widest device you expect, plus maneuvering room—commercial settings often use 48 inches or greater to accommodate diverse users and prevent bottlenecks.
Example: a mid-size mobility scooter may be 28–30 inches wide; adding 6–10 inches for turning and arm clearance suggests a 40–42 inch ramp as a minimum, with 48 inches preferred for frequent public use. Verify device dimensions and simulate turns on paper or with tape before finalizing ramp width.
Materials and Surface Options
Common Ramp Materials
Aluminum offers lightweight, low-maintenance decking and is common for portable ramps, while galvanized steel provides maximum strength for long spans and commercial use; wood (pressure-treated or cedar) costs less but needs sealing and can rot in 5–15 years; concrete gives a permanent solution for slopes and ADA-compliant landings but costs more upfront; composite blends resist moisture and can last 20+ years with minimal upkeep. Ask, “How Do I Know if a Wheelchair Ramp Is the Right Size for My Needs?” by matching the material weight, lifespan, and maintenance requirements to your specific use.
Surface Textures for Grip and Safety
Perforated aluminum decking, non-skid epoxy with silica sand (60–120 grit), and abrasive tape strips are typical choices. Perforations shed water and snow more effectively than solid plates. At the same time, coarse-grit coatings improve traction for scooters and manual chairs—aim for a minimum coefficient of friction of 0.6 in wet conditions. Use a 36″ clear width and consistent texture across the ramp to reduce tipping risk.
A diamond plate may look sturdy, but it can become slick when wet. Instead, choose 1/8″–1/4″ textured pavers, molded rubber treads, or mechanically bonded grit that meet ADA slip-resistance tests. For heavy-use entries, install 1″ wide abrasive strips every 12–18″ at the bottom and top landings to stop momentum; test samples in rainy and icy conditions before committing to a full deck system.
Weather Considerations
Coastal salt air accelerates corrosion—select marine-grade aluminum or stainless steel fasteners and avoid bare steel unless hot-dip galvanized. In freeze-thaw climates, concrete must use air-entrained mixes and control joints to prevent spalling, while wood should be elevated and sealed to limit moisture uptake. Heated ramp systems (electric mats or embedded cables) prevent ice buildup on critical access routes.
For snowy regions, prioritize decks with 1/4″ drainage holes or gaps and sloping cross-drains to prevent standing water that freezes; avoid metal finishes that become brittle in extreme cold and plan for routine snow removal using plastic shovels and non-chloride traction agents (sand) to protect surfaces and fasteners.
Local Regulations and Compliance
Understanding ADA Guidelines
You must follow ADA standards: a maximum slope of 1:12 (one inch rise per 12 inches run), maximum unbroken rise of 30 inches per run, minimum clear width of 36 inches, and handrails for rises over 6 inches with heights 34–38 inches; landings must be at least 60 inches long. Ask yourself: “How Do I Know if a Wheelchair Ramp Is the Right Size for My Needs?” by measuring rise and calculating run with the 1:12 rule.
Building Codes for Ramps
Local building codes often layer additional requirements on top of the ADA: states like California (Title 24) and cities like New York may require specific materials, slip resistance, or anchoring for seismic zones. Expect variations in guardrail details, required edge protection, and snow/ice mitigation standards; nonconforming ramps can result in fines or removal.
Municipal codes may require structural documentation showing design live loads and attachment methods. For example, handrail height, guard spacing, and edge curbs typically mirror ADA requirements, but materials and fastener specifications can differ in coastal or seismic jurisdictions. You should check local code excerpts or sample permits to determine the exact numeric limits and required testing (such as slip-resistance ratings and anchor pull-out values) before ordering modular systems.
Permits and Professional Consultation
Most permanent ramps require a building permit and at least one inspection; permit fees typically range from approximately $50 to $500. Hire a licensed contractor or accessibility specialist to submit compliant plans and avoid costly rework. Professional involvement often shortens the review process and ensures the ramp meets both ADA and local code expectations.
Prepare to submit a site plan, ramp layout with slopes and landings, material specs, and, for attached or complex ramps, an engineer’s stamp. Typical plan-review times range from 2 to 6 weeks, with 1 to 3 inspections (footing/foundation and final). Expect design or engineering fees of roughly $200–$1,500 in many jurisdictions; factor these into your project budget.
Maintenance and Safety Tips
- How Do I Know if a Wheelchair Ramp Is the Right Size for My Needs? — Verify clear width, slope, and landing dimensions against your user’s mobility and equipment.
- Schedule monthly inspections and follow up after storms to check for loose bolts, rust, and worn non-slip surfaces.
- Keep drainage clear, lubricate moving joints every 6 months, and replace abrasive strips every 2–3 years.
Regular Inspection and Upkeep
Inspect your ramp monthly and after heavy rain, snow, or high-traffic events. Tighten fasteners, check welds and brackets, and verify that the ramp remains level with a torpedo level across its entire run. Measure clear width (minimum 36 inches) and landing depth (minimum 60 inches) if you suspect movement, and repair surface deterioration or edge damage immediately to avoid slip or tip hazards.
Safety Features to Consider
Specify handrails at 34–38 inches on both sides, a minimum clear width of 36 inches, and continuous edge protection at least 2 inches high to prevent wheels from rolling off. Maintain a maximum slope of 1:12 for most power chairs and scooters, and choose textured aluminum or abrasive strips with a grit of 60–80 for reliable traction.
Case studies show that adding 2-inch curbs and full-length handrails reduced wheel-off incidents by over 60% in residential trials. Additionally, installing reflective tape and motion-activated lighting enhances nighttime visibility. Confirm that materials meet load ratings—aluminum often supports over 600 lbs, while some modular systems rate 300–500 lbs—and label the ramp with its weight capacity and user restrictions.
Personalizing Your Ramp for Enhanced Functionality
Choose modular sections to easily change the slope, add gate or side panels for child safety, or fit textured, color-contrasting strips to help users with low vision. Integrate foldable thresholds for temporary needs, and install low-voltage LED strips along handrails for safer night use while keeping maintenance minimal.
Calculate the rise-to-length precisely: an 18-inch rise at 1:12 requires 18 feet of ramp run. You can break that down into three 6-foot modules with intermediate 60-inch landings to stay compliant and make installation easier. Select aluminum for low maintenance or pressure-treated wood, sealed annually; verify that the rail height, landing size, and slope match your user’s chair dimensions and turning radius. Any modifications should be checked against local codes and the ramp’s rated capacity before use.
The ideal ramp size balances slope, length, and landings to ensure safe movement. Follow a 1:12 slope guideline for manual wheelchairs, ensure level landings and sufficient width for your device, and allow space for turns. How Do I Know if a Wheelchair Ramp Is the Right Size for My Needs? Verify slope, clearance, surface traction, and consult a professional to confirm the ramp matches your abilities and daily environment.
FAQ
Q: How Do I Know if a Wheelchair Ramp Is the Right Size for My Needs?
A: Start by measuring the vertical rise from the lower ground to the doorway or entry point. Use the rise to calculate the required run using slope guidelines (see next answer). Ensure the ramp width accommodates the user and any attendant. A minimum clear width of 36 inches is standard; 42–48 inches provides more comfort. Confirm required landings for level access at the top and bottom (typically 60 inches deep) and any intermediate landings for long runs or turns. Verify the ramp’s weight capacity covers the user, wheelchair, batteries, and any attendant — choose a margin above the expected combined weight. Check local building codes and ADA/public access standards, if applicable. If the calculated run, available space, weight rating, and safety features (handrails, edge protection, non-slip surface) all align with the user’s needs, the ramp size is appropriate.
Q: How do I measure my space to determine ramp length and slope?
A: Measure vertical rise in inches from the lower ground surface to the threshold. For each inch of rise, apply the slope ratio you plan to use to determine the run length. With a 1:12 slope, multiply the rise (in inches) by 12 to obtain the run (in inches). Example: 24″ rise × 12 = 288″ run (24 feet). Convert inches to feet by dividing by 12. Factor in required landings: a landing at the top and bottom (typically 60″ deep) and intermediate landings for any change of direction. Measure the available horizontal space to confirm that the run and landing lengths fit. Mark the locations of obstacles (such as doors that swing out, handrails, and utility boxes) that may affect placement. If space is limited, consider switchback/modular designs or shorter, steeper ramps only if safe and code-compliant.
Q: What slope and ramp length should I choose for manual versus powered wheelchairs?
A: For public-access ramps, the ADA maximum slope is 1:12 (one inch rise per 12 inches run). For private residential use, a scale of 1:12 is recommended for safety and independence. Manual wheelchair users generally need gentler slopes—1:12 or shallower—because propelling on steeper grades is strenuous. Powered wheelchair users can manage slightly steeper grades for short distances; however, they should avoid sustained slopes steeper than 1:10 and do not exceed 1:8, except under specialized circumstances with a professional assessment. When using steeper slopes, include handrails and non-slip surfacing, and consider assisting. Always prioritize longer run/shallower slope if space permits.
Q: What width, landing size, and safety features should a properly sized ramp include?
A: Minimum clear ramp width is 36 inches; 42–48 inches is preferable for easier passing and comfort. Landings should be at least 60 inches long and as wide as the ramp for top and bottom landings; intermediate landings are required where a ramp changes direction. Handrails are typically required on both sides when the rise exceeds 6 inches; handrail height should be 34–38 inches from the ramp surface and provide continuous gripping surfaces. Include edge protection (such as curbs or barriers) at least 2 inches high to prevent wheels from slipping off. Use non-slip surfacing, provide adequate drainage outdoors, and ensure transition plates are level and smooth. Adequate lighting and a clear approach path are essential components of a safe design.
Q: How should I account for weight capacity, materials, and local codes when selecting ramp size?
A: Determine the combined weight of the wheelchair or scooter, batteries, user, and any attendant; choose a ramp rated above that total—common ratings range from 300 to 1,000+ pounds depending on design. Select materials based on their use: aluminum (lightweight, low maintenance, and modular/portable), wood (customizable, cost-effective but requires maintenance), concrete (durable and permanent), and composite (low maintenance, good traction). Verify the load rating and slip resistance of any modular system. Check local building codes, zoning rules, and permit requirements; public-access ramps must meet ADA or local accessibility standards. If unsure, consult a licensed contractor or accessibility specialist to ensure structural adequacy, compliance, and safe installation.
Introducing Kevin Olrich, Owner of CAPS Remodeling. As a trusted expert in the field of barrier free remodeling Kevin brings a compassionate approach to create safer, more comfortable, and independent living conditions for the elderly and disabled throughout the State of Michigan. His leadership and experience is at the core of how CAPS provides the best solutions to meet the unique needs of our customers and medical professionals.


