
Residential lift elevator in Madison Heights vs traditional elevators—pros and cons
November 18, 2025
Home Medical Equipment in Madison Heights
December 2, 2025
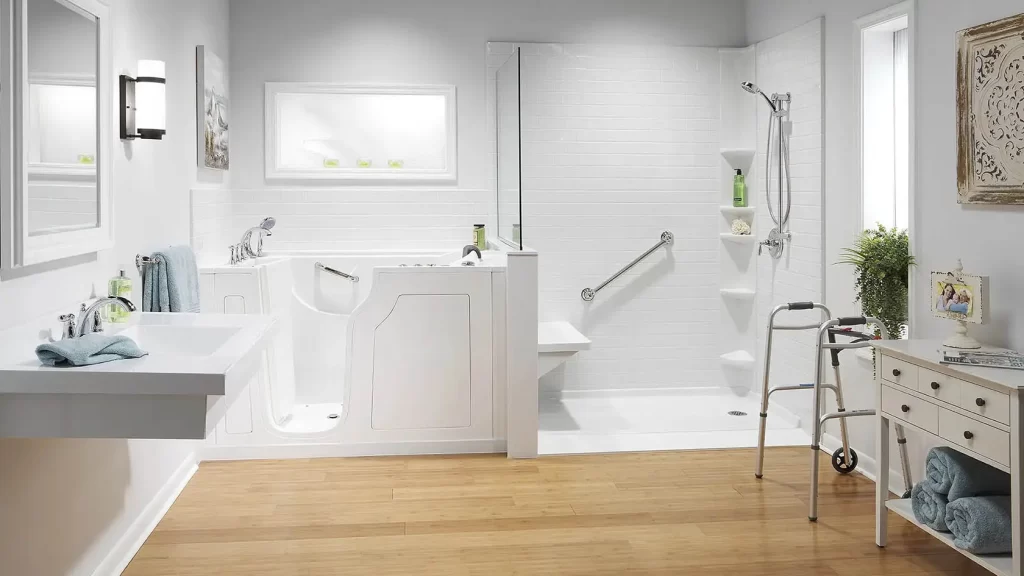
Grab bars are more than just functional bathroom accessories—they are critical safety tools that help prevent accidents in Madison Heights homes. Bathrooms are one of the most dangerous rooms in any house due to slippery surfaces and frequent movement, especially for older adults or individuals with mobility issues. Installing grab bars near key areas like the shower, tub, and toilet provides reliable support, making daily routines safer and more comfortable. Whether you’re planning for aging in place or simply want to enhance bathroom safety, grab bars offer peace of mind and reduce the risk of falls and injuries.
Choosing the Right Grab Bar for Your Needs
Selecting the right grab bar involves more than just picking a style that matches your bathroom decor. It’s important to consider the material, size, and load capacity. Stainless steel and powder-coated aluminum are popular choices for their durability and resistance to moisture. The ideal diameter for a grab bar is between 1.25 and 1.5 inches, ensuring a comfortable grip for most users. Load ratings should be at least 250 pounds, especially for permanent installations. You can also choose from straight, L-shaped, angled, or fold-down models depending on your space and mobility needs.
Optimal Locations for Grab Bar Installation
Inside the Shower and Tub
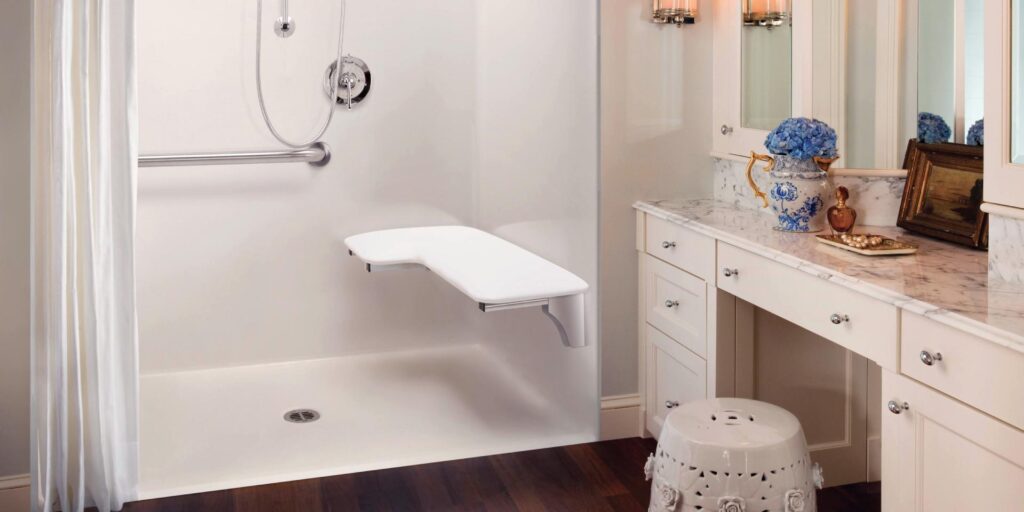
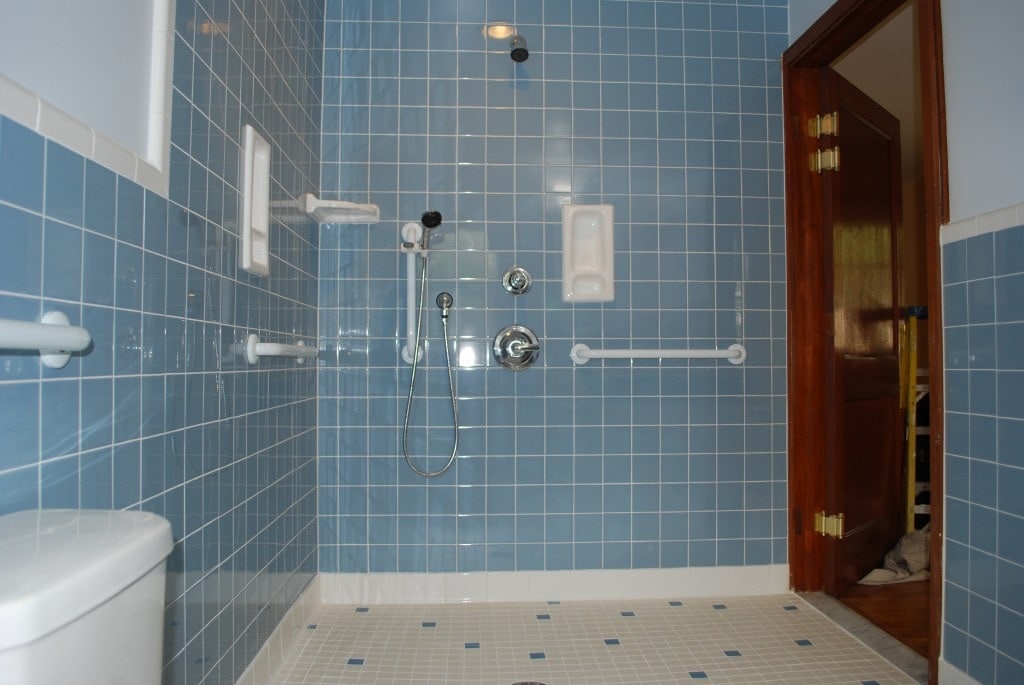
The back wall of your shower or tub is a prime spot for a horizontal grab bar. Mount it at a height of 33–36 inches above the finished floor to support standing and sitting transfers. If your shower has a built-in seat, place a grab bar beside it for added safety. For extra stability, consider adding a vertical grab bar near the entry point to help with balance when stepping in and out.
Beside the Toilet
A horizontal grab bar installed on the sidewall next to the toilet, centered at 33–36 inches above the floor, can assist with sitting and standing. For even greater support, add a rear grab bar behind the toilet. Pairing these with a raised toilet seat can further reduce strain for those with limited mobility.
Sink and Vanity Areas
A vertical or short horizontal grab bar beside the sink can help steady users while bending or using the mirror. Make sure the bar doesn’t interfere with knee clearance but is still within easy reach, ideally at the same height as other bathroom grab bars. For pedestal or wall-mounted sinks, anchor the grab bar into blocking or a metal backplate to avoid stressing the plumbing.
Installation Techniques for Maximum Safety
Secure Mounting Methods
Always anchor grab bars to wall studs or use manufacturer-rated anchors. In wet areas, stainless steel screws at least 2.5–3 inches long are recommended. Apply marine-grade silicone behind the flanges for waterproofing. If studs aren’t available, install solid backing (minimum 1/2 inch exterior-grade plywood) or use certified toggle systems rated for 250+ pounds. This ensures the bar can support the intended weight and prevents pull-out failures.
Professional Installation vs. DIY
While DIY installation is possible, hiring a certified installer in Madison Heights is highly recommended for optimal safety and compliance with local regulations. Professionals can ensure proper backing, waterproofing, and adherence to ADA guidelines. They can also advise on the best locations and mounting techniques for your specific bathroom layout.
Building Codes and ADA Compliance
Madison Heights follows the Michigan Building Code, which is based on the International Building Code (IBC). For grab bar installations, it’s important to verify local requirements with the city’s Building Department. ADA standards recommend mounting horizontal grab bars at 33–36 inches above the finished floor and ensuring they can resist at least 250 pounds of force. For toilets, common ADA lengths are a 36-inch rear bar and a 42-inch side bar. These standards serve as a practical safety baseline, even in private homes.
Maintenance and Inspection Tips
Regularly inspect grab bars every 3–6 months for signs of looseness, rust, or chipped finishes. Tighten fasteners as needed and wipe away soap buildup. In wet areas, re-seal flange gaps annually with mildew-resistant silicone. If you detect any movement, remove the bar to inspect backing and fasteners. Replace corroded hardware promptly to maintain safety and durability.
Enhancing Accessibility and Independence
Grab bars increase independence for all users, including older adults, children, and individuals with temporary or permanent mobility limitations. By strategically placing bars where transfers occur, you can accommodate walkers, cane users, and caregivers while reducing the need for assistance. ADA-style design thinking ensures that your bathroom is accessible and safe for everyone.
Alternative Safety Solutions
Pair grab bars with other safety features like fold-down shower seats, handheld showers, non-slip tiles, and raised toilet seats. Installing a thermostatic mixing valve set to 120°F (49°C) can prevent scalding, while an emergency call pendant within reach improves response times. Make sure all safety features meet load specs and support at least 250 pounds.
Aesthetic Considerations for Grab Bars
Safety and style can go hand in hand. Choose finishes like brushed nickel, oil-rubbed bronze, or matte black to match your bathroom decor. Concealed flanges or decorative rosettes can make grab bars blend seamlessly with your design. Select lengths that align with tile grout lines for a cohesive look. For a minimalist appearance, consider recessed bars or surface-mount options with long stainless fasteners into studs or blocking.
Frequently Asked Questions
1. Where should I install grab bars in my bathroom?
Grab bars should be installed in high-risk areas such as beside the toilet, inside the shower, and at the entry of the tub. Horizontal bars at 33–36 inches above the floor are ideal for most users. Vertical bars at the shower entry provide extra support for stepping in and out. Always position bars where they are easily accessible and align with natural movement patterns.
2. How do I ensure my grab bars are securely mounted?
Secure mounting is crucial for safety. Always attach grab bars to wall studs or use manufacturer-rated anchors. In wet areas, use stainless steel screws at least 2.5–3 inches long and apply marine-grade silicone for waterproofing. If studs aren’t available, install solid backing or use certified toggle systems rated for 250+ pounds. Proper installation prevents pull-out failures and ensures the bar can support the intended weight.
3. What size and type of grab bar should I choose?
Grab bars should have a diameter of 1.25–1.5 inches and be able to support at least 250 pounds. Common sizes are 12”, 18”, 24”, 32”, 36”, and 42”. Choose a style that fits your bathroom decor and functional needs. For a modern look, consider multi-functional grab bars that double as towel racks or shelves. Always select bars made from corrosion-resistant materials for long-lasting safety.
4. Can I install grab bars myself, or should I hire a professional?
While DIY installation is possible, hiring a professional is recommended for the highest level of safety and compliance. Professionals ensure proper backing, waterproofing, and adherence to ADA guidelines. They can also advise on the best locations and mounting techniques for your specific bathroom layout. For peace of mind and optimal safety, consider hiring a certified installer in Madison Heights.
5. How do I maintain and clean my grab bars?
Regular cleaning with mild soap and water is sufficient for most grab bars. Avoid abrasive cleaners that can damage the finish. Check the mounting hardware periodically for signs of wear or corrosion, especially in wet environments. If you notice any looseness or damage, tighten or replace the hardware immediately to maintain safety. Proper maintenance ensures your grab bars remain reliable and effective for years to come.
Introducing Kevin Olrich, Owner of CAPS Remodeling. As a trusted expert in the field of barrier free remodeling Kevin brings a compassionate approach to create safer, more comfortable, and independent living conditions for the elderly and disabled throughout the State of Michigan. His leadership and experience is at the core of how CAPS provides the best solutions to meet the unique needs of our customers and medical professionals.


