
Safe & Simple: Installing a Grab Bar in a Fiberglass Shower
January 23, 2026
Accessible Bathroom Remodeling in Sterling Heights, MI: Safe, Stylish, and Built for Independence
February 3, 2026
When a bathroom is hard to use, every daily task becomes a hurdle. The good news: with the right plan—clearances, fixtures, and a few smart upgrades—you can transform the space into something safer, easier, and more independent. This step-by-step guide shows how to make a bathroom handicap accessible without guesswork, plus typical costs, layout tips, and a practical sequence for getting it done.
The quick checklist (read this first)
- A door that’s easy to open and has at least 32″ of clear passage
- A clear path to each fixture (toilet, sink, shower/tub)
- Non-slip flooring and strong lighting with minimal glare
- Sturdy grab bars are placed where hands naturally reach
- A shower you can enter without stepping up—or a supportive tub solution
- A toilet height and position that helps with transfers
- A sink you can roll under or comfortably sit at
- A few “extras” that reduce effort: handheld shower, lever handles, anti-scald controls
- One trusted contractor who understands accessibility and coordinates everything
If this list feels like a lot, that’s normal. Let’s break it down.
Layout basics: clearances that make the room work
The most common reason accessibility projects struggle is the tight space. Focus on these basics:
- Doorway & approach: Aim for 32″ of clear opening (36″ preferred). Pocket or barn-style doors can free up swing space.
- Turning space: A 60″ diameter turning circle helps wheelchair users rotate comfortably. If that’s not possible, T-turn alternatives can still work.
- Shower entry: A zero-threshold or very low threshold reduces tripping and makes rolling in simpler.
- Toilet transfer zone: Leave room for a side transfer—typically 18″ from the centerline of the toilet to an adjacent wall is a common target, so grab bars land where they help.
- Sink knee/foot clearance: For roll-under sinks, target about 27″ high knee clearance with insulated plumbing lines to prevent contact burns.
Even small rooms can become workable by rethinking door swings, swapping in a wall-hung sink, or converting a tub to a low-entry shower.
Must-have upgrades (and how to choose them)
1) Grab bars that feel natural to use
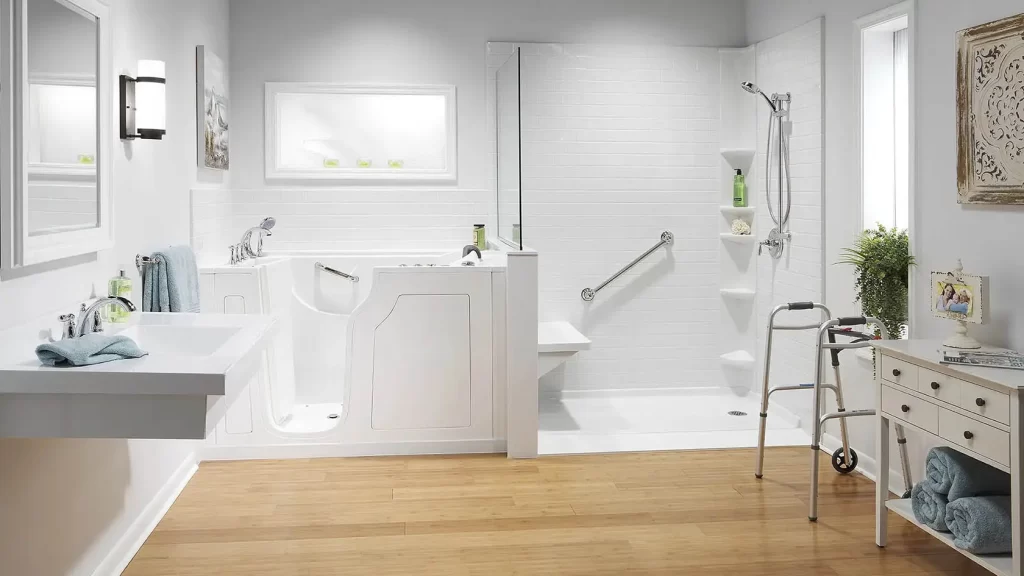
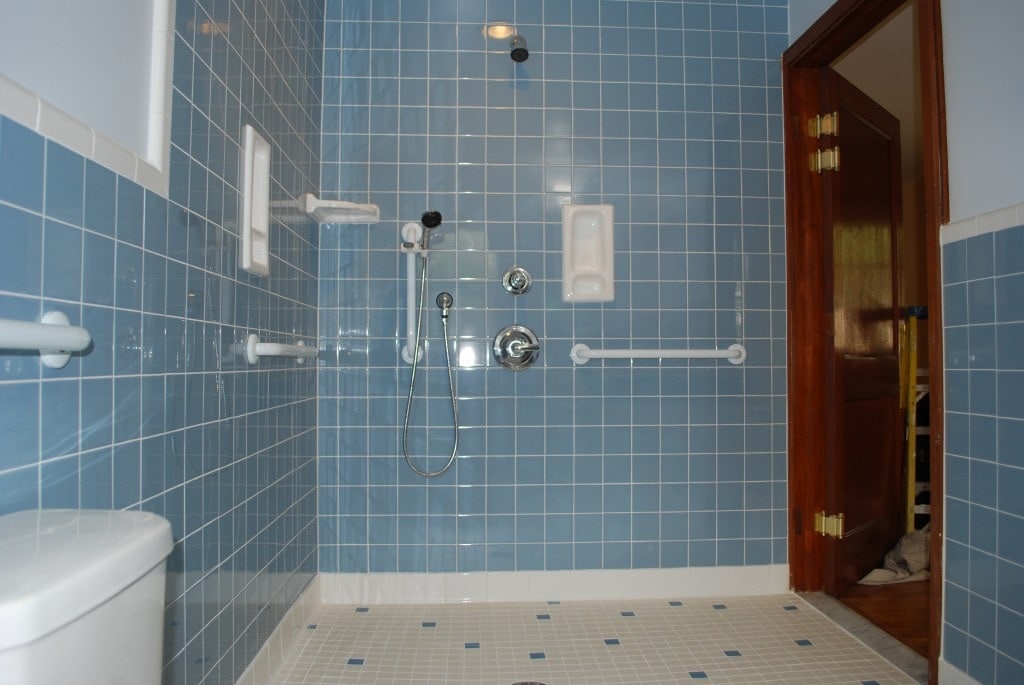
Place vertical or angled bars at shower entries, a horizontal bar along the shower wall, and bars around the toilet for sit-to-stand support. Select textured finishes for grip, and anchor everything to solid blocking or to rated anchors (your installer will handle the backing).
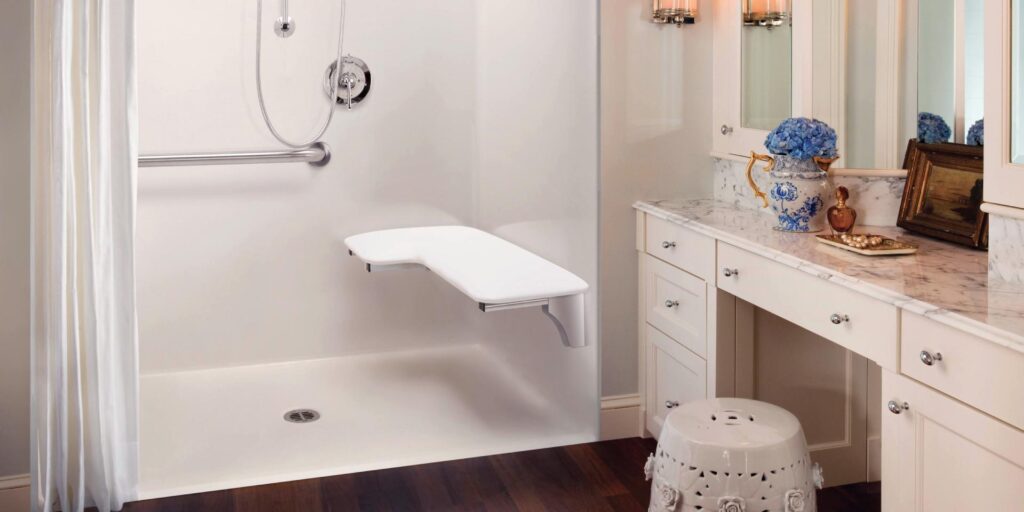
2) A safer shower (or tub) you can actually enter
- Roll-in or low-entry showers simplify access. Add a handheld shower with an adjustable slide bar so the spray head moves toward you, not the other way around.
- Include a fold-down or built-in seat at a comfortable height.
- If you keep a tub, choose a solid, secure transfer bench and add non-slip flooring plus bars at the entry and along the long wall.
3) Toilet height and position that supports transfers
Comfort-height toilets (often around 17–19″ seat height) reduce knee bend. Position the toilet so you have space on at least one side for a transfer, and mount side and rear grab bars at heights that match the user’s reach.
4) A sink that suits seated or standing use
- Wall-hung or console sinks free up knee space.
- Single-lever or touch faucets reduce effort.
- Insulate hot water lines and drain traps to avoid burns during contact.
5) Flooring that resists slips
Look for textured porcelain, small mosaic tiles with lots of grout lines, or high-traction vinyl. In the shower, choose low-sheen, slip-resistant tile. Add a linear drain to keep water moving away from the standing or seating area.
6) Lighting and controls that reduce strain
Layer overhead lighting with bright, even task lighting at the mirror. Use switch rockers or motion sensors, and consider night-lights along the baseboard path to the toilet. Avoid glossy tile that throws glare.
7) Doors, hardware, and storage
- Lever handles beat knobs for grip.
- Pocket or barn doors reclaim floor space.
- Pull-out shelves and D-shaped cabinet pulls keep strain low.
- Keep towels and daily items at shoulder to waist height—no step stools required.
8) Water safety
Add anti-scald mixing valves (pressure-balanced or thermostatic) to maintain a steady temperature, even if someone flushes or runs a tap elsewhere.
What it might cost (and what drives the price)
Budgets vary based on room size, product selection, and whether you’re relocating plumbing or upgrading fixtures. Typical ranges:
- Grab bars only: Lower cost when walls already have blocking; higher if adding backing or tile work.
- Toilet swap with bars: Moderate, depending on fixture choice and wall reinforcement.
- Tub-to-shower conversion: Mid- to upper range, based on custom tile versus solid-surface surrounds, glass, and drain relocation.
- Full accessibility remodel: Higher range—often includes layout changes, new flooring, lighting, ventilation, and multiple fixtures.
Expect labor to be the largest factor. Material choices (tile vs. solid panels, custom glass vs. curtain, specialty fixtures) also swing the total. Want a deeper planning overview? This guide to accessible bathroom remodeling explains the moving pieces in plain language.
How to make a bathroom handicap accessible (your step-by-step)
Step 1: Walk-through + priorities
List what’s hard today—stepping over the tub? Reaching the controls? Turning to sit? This becomes your must-fix list.
Step 2: Measure the room
Note door width, clear floor area, and distances between fixtures. Sketch the layout. These numbers guide which upgrades will fit.
Step 3: Choose your access path
- If stepping over a tub is the main barrier, a low-entry or roll-in shower is your anchor upgrade.
- If sitting/standing is hardest, start with toilet height + bars.
- If turning space is tight, rework the door swing or replace it with a pocket/barn door.
Step 4: Plan structure and backing
Strong blocking behind tile and drywall lets grab bars go exactly where hands reach. Your contractor will coordinate blocking during rough-in.
Step 5: Select surfaces and fixtures
Pick non-slip flooring, low-sheen shower tile, and simple, easy-clean fixtures. Choose a handheld shower that slides up and down, a folding seat rated for the user’s weight plus a safety margin, and a safety lock.
Step 6: Lighting, outlets, and ventilation
Bright, even light reduces missteps. Add GFCI protection where required and a quiet, high-performance exhaust fan to control moisture.
Step 7: Safety check
Before closing walls, confirm blocking locations, drain slopes, threshold height, and control placement (can the user reach the shower valve from a seated position without getting sprayed?).
Step 8: Finishes and hardware
Install lever handles, D-pulls, and mirror heights that work from both seated and standing positions.
Step 9: Final walkthrough + adjustments
Small tweaks—moving a shower wand cradle a few inches, lowering a towel bar, changing bulb temperature—often make the biggest daily difference.
Smart placements that matter
- Shower controls near the entry so you can turn on water without reaching through the spray.
- Grab bars where motion changes—at step-in, at the seat, and by the valve.
- The toilet paper holder should be within easy reach when seated, not behind the shoulder.
- Mirror tilt or a taller mirror to serve both seated and standing users.
- Shelf ledges for soap and shampoo are reachable from a sitting position.
Product notes that save headaches
- Grab bar finishes: Brushed textures provide a secure grip and hide water spots.
- Seats: Check the weight rating; wall-mounted seats need proper blocking and fasteners.
- Glass vs. curtain: Curtains often work better for roll-in access and leave more transfer space; glass can help contain water but needs careful layout to avoid narrowing the entry.
- Drains: Linear drains at the shower entry help keep the rest of the floor flatter; point drains are also acceptable with proper slope and tile size.
Timeline: what to expect
- Planning & selections: A few days to a few weeks, depending on how many choices you want to make.
- Typical construction:
- Grab bars only: often a day
- Tub-to-shower conversion: usually several days to a couple of weeks
- Full remodel: often 2–4+ weeks, depending on scope, tile work, and inspections
Lead times for special-order fixtures and glass can extend the schedule; ordering early keeps things moving.
Common pitfalls (and how to avoid them)
- Bars without backing: Bars must be anchored into blocking or with rated anchors—no exceptions.
- Slippery, glossy tile: Looks great, performs poorly when wet. Choose traction.
- Thresholds too high: Even 1/2″ can be a trip hazard. Go lower if possible.
- Controls out of reach: Place the handheld shower and valve within reach from a seat.
- Beautiful but blinding lighting: High-gloss tile and bare bulbs cause glare—use diffused, bright, even light.
- Ignoring the approach: A wide, obstacle-free path to the bathroom matters as much as the room itself.
Who should manage the work?
Accessibility remodeling is a coordinated project that includes framing and backing, plumbing, waterproofing, tile or shower panels, electrical, ventilation, and careful fixture placement. Working with a team experienced in accessible layouts means fewer surprises and a result that feels right from day one. For more planning help, see this article on how to make a bathroom handicap accessible with practical, real-world steps: how to make bathroom handicap accessible.
Maintenance and long-term safety
- Retighten hardware (bars, seats) per the manufacturer’s intervals.
- Re-seal grout/stone on schedule, or pick low-maintenance solid panels up front.
- Replace worn non-slip mats before they smooth out.
- Check caulk lines on the floor and corners; repair any cracks promptly.
- Keep pathways clear—no detours from hamper or step stool.
Budget savers that don’t cut safety
- Use solid-surface or waterproof panel walls in the shower instead of full custom tile.
- Choose a curtain instead of custom glass to keep the entry wide and costs lower.
- Reuse existing sound fixtures, such as a vanity cabinet, but switch to a wall-hung sink in powder-tight rooms to gain space.
- Do grab bars and lighting now; phase larger items later.
FAQs
1) What is the first upgrade to do if I can only pick one?
Start where the barrier is greatest. For most, it’s the tub edge. A low-entry or roll-in shower with a handheld wand and seat often delivers the biggest day-to-day improvement.
2) Do I need a full gut remodel to make it accessible?
Not always. Many homes achieve major gains with a tub-to-shower conversion, grab bars, a comfort-height toilet, and lever hardware—without moving walls.
3) How high should I mount grab bars?
It depends on the user’s reach and transfer style. Common ranges exist, but the best approach is to mark hand positions during a dry run and set the bars accordingly. Your installer can fine-tune placement.
4) Are non-slip coatings enough for the floor?
Coatings help, but starting with a textured, slip-resistant surface is more reliable. In showers, smaller tiles or textured panels add traction.
5) Can a small bathroom still be accessible?
Yes—by reclaiming space with a pocket door, choosing a wall-hung sink, and focusing on a curbless (or very low curb) shower. Even a few inches of extra maneuvering room can change how the room functions.
Introducing Kevin Olrich, Owner of CAPS Remodeling. As a trusted expert in the field of barrier free remodeling Kevin brings a compassionate approach to create safer, more comfortable, and independent living conditions for the elderly and disabled throughout the State of Michigan. His leadership and experience is at the core of how CAPS provides the best solutions to meet the unique needs of our customers and medical professionals.

